
To get your product in different colour variations,
•Log in
 • Then start with « ouvrir un projet ou image » and select the image of your product to be recolored
![]() • Add the colors you want to have for a first part of your product by clicking on « Ajout colorie »
• Add the colors you want to have for a first part of your product by clicking on « Ajout colorie »
![]() • To remove a color, select the garbage icon next to it
• To remove a color, select the garbage icon next to it
• Then frame with the transparent rectangle the area where the part of your product you want to recolor is located
![]() • Once the part is framed, click on “Fermer” in the top right corner
• Once the part is framed, click on “Fermer” in the top right corner
![]() • After select the magic wand icon located at the top
• After select the magic wand icon located at the top


• Briefly put a green line with the green + where the area to be recolored on the image is located and with the red – where it is not necessary
to recolor by holding the left click after selecting the + or -
 • If you made a mistake in the previous step, click on the trash icon to repeat this step
![]() • Once the part to be recolored vaguely selected, click on « valider cette image » in the top right corner
• Once the part to be recolored vaguely selected, click on « valider cette image » in the top right corner
The selected area will now be recolored, however the preselected area will not fully match the desired area.
 • To properly redefine the area to be recolored use the toolbar with the paint roller, the bar and the paint pot
• Once one of its three tools is selected, the left mouse click will add area to be recolored while the right mouse click will remove of it.
Details on the tools:
![]()
![]() • For the paint roller, the toolbar on the left side of the tool menu will allow you to adjust the thickness of the roller. Hold the left click or right click of your mouse depending on whether you want to add or remove areas to be colored by moving your mouse to use the brush.
• For the paint roller, the toolbar on the left side of the tool menu will allow you to adjust the thickness of the roller. Hold the left click or right click of your mouse depending on whether you want to add or remove areas to be colored by moving your mouse to use the brush.
![]() • For the bar, it will allow you to add or remove rectangles from the area to be colored and the bar to the left of the tool menu will allow you to adjust the bar thickness. Click where you want to put the first end of your bar and hold the left or right click all the way to the other end where you want to put the bar.
• For the bar, it will allow you to add or remove rectangles from the area to be colored and the bar to the left of the tool menu will allow you to adjust the bar thickness. Click where you want to put the first end of your bar and hold the left or right click all the way to the other end where you want to put the bar.
![]() • For the paint jar, it will allow you to add or remove areas to color from the different color areas on the image you are coloring and the toolbar on the left will allow you to adjust the sensitivity of the paint jar to declare whether areas are different or not according to their original colors. Click on an area to make it an area to color or not
• For the paint jar, it will allow you to add or remove areas to color from the different color areas on the image you are coloring and the toolbar on the left will allow you to adjust the sensitivity of the paint jar to declare whether areas are different or not according to their original colors. Click on an area to make it an area to color or not
![]() • The return arrow allows you to go back one step
• The return arrow allows you to go back one step
To help you delimit the area to colorize, you have several zoom tools available.
![]()
![]() • The zoom window will zoom in on the area flown by your mouse icon, you will be able to adjust this magnification to that of the bar present in the “zoom” window
• The zoom window will zoom in on the area flown by your mouse icon, you will be able to adjust this magnification to that of the bar present in the “zoom” window
![]() • The zoom image will allow you to zoom the entire image for pixel accuracy
• The zoom image will allow you to zoom the entire image for pixel accuracy
• Once zoomed, you will be able to walk around your image using the slider bars on the right and at the bottom of your screen
![]() • Click on « éditer » at the top of your screen
• Click on « éditer » at the top of your screen
![]()
• Then select “Ajouter une déclinaison” and repeat the steps “choice of colours” and “selection of the area to be recolored”
![]() • To remove a variation, select the garbage icon next to the variation name, just on top of « Ajout de colorie »
• To remove a variation, select the garbage icon next to the variation name, just on top of « Ajout de colorie »
![]() • To switch from one variation to another, select the desired variation from the drop-down menu to the left of the magic wand icon
• To switch from one variation to another, select the desired variation from the drop-down menu to the left of the magic wand icon
![]() • To switch from one color to another, select the color circle to the left of the edit icon
• To switch from one color to another, select the color circle to the left of the edit icon
![]() • You can also adjust the color using the two bars to the left of the color circle
• You can also adjust the color using the two bars to the left of the color circle
![]()
![]() • Click on the icon circular arrow of the window “ preview” to get a preview of each possible combination from the different areas you have recolored.
• Click on the icon circular arrow of the window “ preview” to get a preview of each possible combination from the different areas you have recolored.
![]() • You can also adjust the size of the preview images using the magnification bar in the “preview” window.
• You can also adjust the size of the preview images using the magnification bar in the “preview” window.
• By clicking on one of the thumbnails of the window “preview”, this will allow you to display the color combination corresponding to the selected thumbnail
So if you have 3 variations and 2 different colors for the first area, 3 for the second and 6 for the last, you will get 2 x 3 x 6, i. e. 36 images corresponding to all the possible combinations.
Interruption of your work
![]()
![]() • If you need to interrupt your work, you can save your progress on recoloring by clicking on « fichier » and then « enregistrer »
• If you need to interrupt your work, you can save your progress on recoloring by clicking on « fichier » and then « enregistrer »
![]()
![]() • Select then “fichier” then « nouveau/charger » to resume your work where you were
• Select then “fichier” then « nouveau/charger » to resume your work where you were
Work done
![]()
![]() • Once the recoloring is finished, select “fichier” then “export” to get your images recolored, you will get them in . zip format
• Once the recoloring is finished, select “fichier” then “export” to get your images recolored, you will get them in . zip format
• You can then use a program like Winrar to extract the images of the . zip
In this window you have the possibility to open your own image with the button « ouvrir un projet ou image » at the top
![]()
Or you can select one of the two suggested examples by clicking on “start” below the desired example
![]()
On this window you will be able to go to the “area to be colored” window with the help of the close button in the top right corner
![]()
To import or export variations already created or to be used on other products, click on “importer” or “exporter” as appropriate
![]()
![]()
To add a variation, click on « Ajouter une déclinaison »
![]()
To change the declination, click on the name of the desired declination next to « Ajouter une déclinaison »
To change the name of a declination, once it is selected, click on its name below the button « Ajouter une déclinaison »
To remove a variation, click on the trash icon next to its name
![]()
To add a color, select the button « Ajout colorie »
![]()
To change the color of a color, click on the color ed surrounded square to the left of the color name
![]()
A window will appear in which you can change the color either by clicking on the pipette, by selecting the color on the bar with the color spectrum to the left of the pipette icon and then adjusting the light with the color chart above the same bar, or by entering the coordinates of your colors below the pipette icon. The coordinate system can be selected between RGB, HSL and HEX by clicking on the system name below where you enter the coordinates.
To change the name of a color, click on its name to the right of the surrounded colored square that is used to change the color of a color
To remove a colored, click on the trash icon next to its name
![]()
To delimit the part of the image where the area to be recolored for the selected declination is located, click on the image to the left of the color menu on one of the vertices of the rectangle where you want to put the area and drag your mouse to the opposite vertex. The area thus delimited will appear framed by a thin blue frame.
On this window you will be able to return to the “variations” window with the help of the edit button at the top in the middle
![]()
To change the image or reopen an area delimitation to be colored already started, click on « fichier » and then « nouveau/charger »
![]()
![]()
To erase the delimitation of the area to be colored for the selected version, click on “fichier” and then “erase”
![]()
![]()
To record your progress of delimiting the areas to be colored to be able to resume it later with « nouveau/charger », click on « fichier » and then « enregistrer »
![]()
![]()
To switch to the “export” window, click on “fichier” and then “export”
![]()
![]()
To view helpers, click on “?"
![]()
To start presetting the area to be recolored, click on the magic wand icon
![]()
Once the magic wand is selected, to add the area to color, click on the green + then click and hold the left click to indicate where the area to color is
Once the magic wand has been selected, to remove the area to be colored, click on the – red then click and hold the left click to indicate where the area to be colored is not
![]()
To start the magic wand step again, click on the trash can
To validate this pre-delimitation, click on "valider"
![]()
To go back, click on "annuler"
![]()
To change the game you want to color, click on the drop-down menu to the right of the magic wand, then select the game from the menu
![]()
To change the color of the part to be recolored, click on the colored circle
![]()
To adjust a color in the “area to be colored” window, use the two bars to the right of the colored circle
![]()
To zoom in, use the bar at the top of your screen
![]()
To get a localized zoom, hover your mouse cursor and look at the “zoom” window
![]()
To change the size of the localized zoom, use the bar in the “zoom” window
![]()
![]()
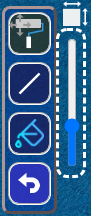
To properly delimit the area to be recolored, use the “tools” window
To add the area to be recolored once a tool is selected, use the left mouse click
To remove the area to be recolored once a tool is selected, use the right click of the mouse
To adjust the size of the brush, use the “Tools” menu bar once the brush is selected
![]()
![]()
To add/remove rectangular bars from area to colorize, select the bar tool then click and hold the click from end to end of the bar you want, the bar thickness is adjusted using the slider bar in the “Tools” menu once the bar tool is selected
![]()
![]()
To add/remove an area of the image to the area to be recolored, click on the paint jar then click on the desired place, the slider of the “Tools” menu will then be used to give the tolerance that the computer should consider when deciding whether it is the same area of the image or not depending on the differences between the colors of the image
![]()
![]()
To return a demarcation step of the area to be recolored back, click on the return arrow of the “Tools” menu
![]()
To preview the recolored image in all color combinations, click on the circular arrow in the "preview" window
![]()
![]()
To change the size of the images in the “preview” window, use the slider in the “preview” window
![]()
![]()
To display a combination among those on the “preview” window, click on the image corresponding
![]()
On this window you will be able to return to the “area to be colored” window with the help of the close button in the top right corner.
![]()
To export only the declination displayed on the “area to be colored”, select the button « exporter déclinaison sélectionnée »
![]()
To export all possible combinations of variations, select the button « exporter tout »
![]()